This guide uses the "QS-Live" add-in as an example.
The installation is for Revit version 2023.1. If you want to install the add-ins for multiple Revit versions, you must perform the installation for each Revit version.
These instructions apply to a new Windows 10 machine with Revit installed, on which no Plandata add-ins are currently present. If Plandata add-ins are already installed on the machine (as indicated by the presence of a "Plandata" tab in the menu) and you wish to uninstall them or perform a fresh installation, please skip to the section "Uninstalling Plandata Add-Ins" before proceeding with the installation instructions.
If an Autodesk Revit update has been installed—for example, from version 2023.0 to 2023.1—we recommend reinstalling the add-ins for that version to prevent potential compatibility issues. To do this, first follow the steps under "Uninstalling Plandata Add-Ins" and then the steps under "Installing Plandata Add-Ins."
The following menu provides step-by-step instructions for installing the Plandata Revit add-ins.
To identify the version of Autodesk Revit that is installed, you must launch Revit. Once Revit has launched and everything has finished loading, the version number will appear in the title bar at the top of the Revit window.
In this case, the version of Revit is "2023.1".
If only a year is listed, such as "Autodesk Revit 2023," there is always a "0" after the period. In the case of "Autodesk Revit 2023," the version would therefore be "2023.0," even if ".0" is not explicitly stated.

You should now close all open Revit windows to avoid any issues during installation.
To install a Plandata add-in, first open the ZIP file required for your version of Revit (right-click the ZIP file -> Open with -> Explorer).
It is important to ensure that the Revit version listed in the ZIP file name matches the version of Revit you have installed, as otherwise compatibility or other issues may arise.
In this example, the QS-Live ZIP file for Revit version 2023.1 is opened. This ZIP file should contain a folder named "Plandata" as well as a file named "EU.Plandata.AddIn.Revit.QSLive.addin" (for other add-ins, the file will have a different name but always ends with the ".addin" file extension).
If file extensions are not displayed, open the "View" tab in File Explorer and check the box next to "File name extensions."

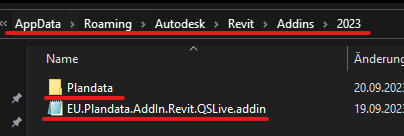
The file and folder must now be placed in the following folder ("YEAR" must be replaced with the year of the Autodesk Revit version; for example, "2023" for "Autodesk Revit 2023.1"):
%appdata%/Autodesk/Revit/Addins/YEAR
To do this, open a new File Explorer window, paste the path into the address bar, replace YEAR with the appropriate year, and press ENTER. If the path cannot be found, copy the path without the YEAR at the end, open that path, and create a new folder in that folder with the name of the YEAR. Then open the folder you just created.
You can then select the "Plandata" folder and the add-in file "EU.Plandata.AddIn.Revit.QSLive.addin" in the open File Explorer window containing the ZIP file, copy them, and paste them into the second File Explorer window containing the installation directory.
The contents of the path "%appdata%/Autodesk/Revit/Addins/YEAR" should now look like this:
Windows may automatically block the add-in files because they come from a different computer. This prevents Revit from loading the add-in successfully.
To check this, first open the following path (replace "YEAR" with the year of the Autodesk Revit version; for example, "2023" for "Autodesk Revit 2023.1"):
%appdata%/Autodesk/Revit/Addins/YEAR
To do this, open a new File Explorer window, enter the path in the address bar, replace YEAR with the appropriate year, and press ENTER.
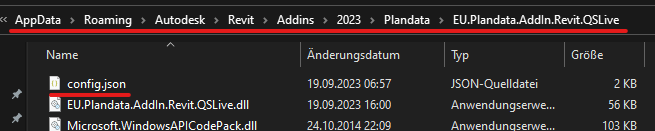
Provided the installation was performed correctly, this folder should contain a folder named "Plandata," which you can now open. This folder contains additional folders, each of which corresponds to a Plandata add-in. To check whether the files are blocked by the newly installed add-in, open the folder for the newly installed add-in. In the case of QS-Live, this is "EU.Plandata.AddIn.Revit.QSLive".
In this folder, select any file with the ".dll" file extension, such as "EU.Plandata.AddIn.Revit.QSLive.dll".
If file extensions are not displayed, open the "View" tab in File Explorer and check the box next to "File name extensions."
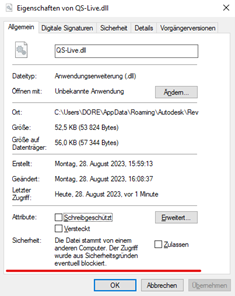
Right-click on the selected file and open its Properties.
In the Properties window that opens, you may see the following security information:
If this security warning does not appear, you can proceed directly to the next step, "Start Revit," since Windows does not block the files and you therefore do not need to allow them.
To load the add-in files, all files must be approved. However, since it’s a hassle to do this manually for every file in the Plandata folder, we’ll use an option that approves all files with just one click.
If the instructions below do not work for technical reasons—for example, because your system administrator has disabled PowerShell (you will see a Windows error message indicating this when you follow the steps below)—you can also enable each ".dll" file individually. Otherwise, contact your system administrator so that they can allow the files for you.
To allow all Plandata Add-In files, first navigate back to the "Plandata" folder or open the following path ("YEAR" must be replaced with the year of the Autodesk Revit version; for example, "2023" for "Autodesk Revit 2023.1"):
%appdata%/Autodesk/Revit/Addins/YEAR/Plandata
Once you are in the "Plandata" folder, which contains the folders for the individual add-ins, open a PowerShell window in that folder as follows:
Hold down the SHIFT key and right-click on an empty area inside the "Plandata" folder. Make sure to right-click on an empty area, not on a folder name.
A context menu should then appear, offering the option "Open PowerShell window here." Select this option (you can release the SHIFT key).
NOTE: This option is only available if you hold down the SHIFT key while right-clicking on the folder. If the option is not available, make sure you held down the SHIFT key. If the option is still not available, please contact your system administrator, as they may have disabled the option for you.
You should now see a Windows PowerShell window with the path to the "Plandata" folder displayed on the first line:

Make sure the displayed path ends with the "Plandata" folder, as you only want to allow our Plandata add-ins. If the path does not end with "Plandata" but, for example, with "2023," close the PowerShell window, open the "Plandata" folder, and repeat the process to open the PowerShell window.
If the path is correct, copy the following command:
dir -Path . -Recurse | Unblock-File
Paste this into the PowerShell window (right-click on the blue area -> Paste). Then press the ENTER key. It should look like this:

If this is the case, the files have been successfully approved, and you can now close the PowerShell window and proceed to the "Start Revit" step.
Once you have successfully completed all the steps, you can now launch Revit. After launching Revit, you should see the "Plan Data" tab in the menu, which contains the installed add-ins.
Each Plandata add-in includes a configuration file that allows for add-in-specific configurations.
However, one thing all add-ins have in common is that you can rename the Revit tab and the panel names within the tab.
To access the configuration file for a Plandata add-in, first navigate to the following path (replace "YEAR" with the year of the Autodesk Revit version):
%appdata%/Autodesk/Revit/Addins/YEAR
In this directory, there should be a folder named "Plandata," which you should now open.
There are now additional folders here, with each folder representing a Plandata add-in.
For example, if you want to rename the Revit tab or panel name for the "QS-Live" add-in, first open the corresponding add-in folder—in this case, "EU.Plandata.AddIn.Revit.QSLive" (the add-in’s name is always at the end).
This folder now contains a "config.json" file:
If you don't see the ".json" file extension, open the "View" tab in File Explorer and check the box next to "File name extensions."
Make a copy of the "config.json" file before proceeding. A file in JSON format is quite prone to errors if commas, quotation marks, or similar characters are not placed correctly. Therefore, you should first make a copy of the "config.json" file, which can be stored in the same folder, since only the "config.json" file is recognized by the add-ins.
You can now double-click this "config.json" file, which should open a simple text editor.
If that doesn't work, right-click the file, select "Open with," choose "Select another app," click "More apps," select an editor, and click "OK." The file should then open in the default Windows text editor.
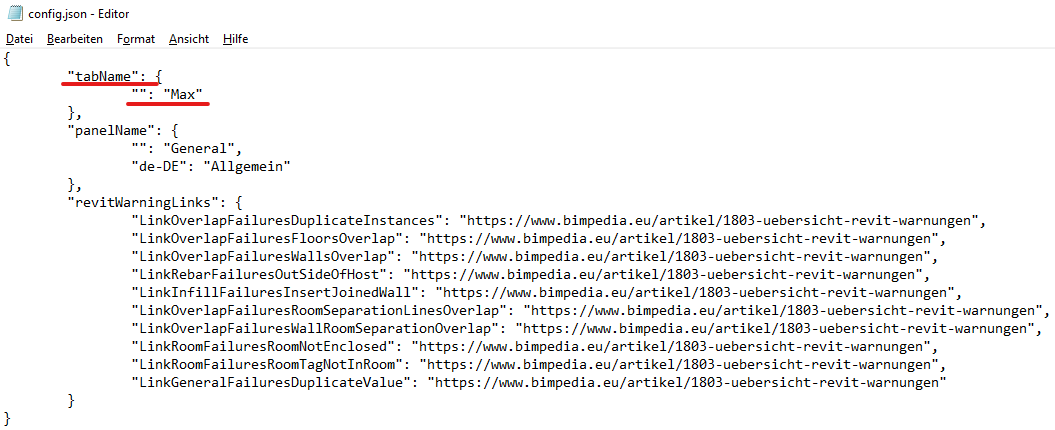
In the open file, you will find the "tabName" key.
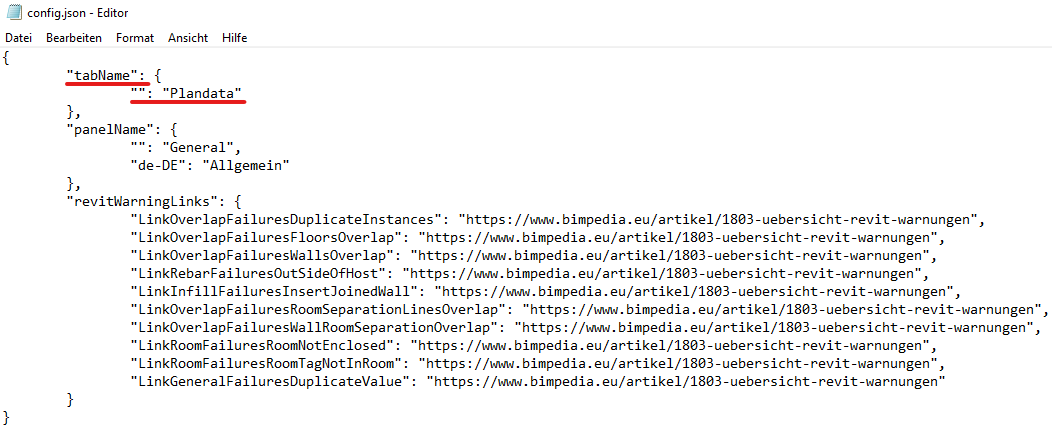
In this example, the value "Max" is set. It should look like this:
You can then save the file and launch Revit. The tab should now have been successfully renamed:

In the open file, you will find the "panelName" key.
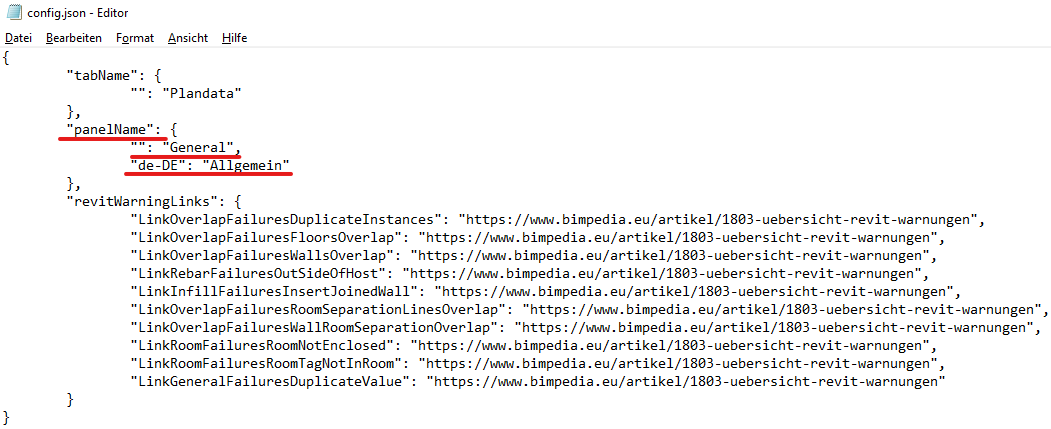
By default, the panel name has two values; in this case, "Allgemein" has been explicitly set for the German language. If Revit is launched in a language other than German, the value without a language assignment—in this case, "General"—is used.
For more information on multilingualism, see the "Multilingualism" tab.
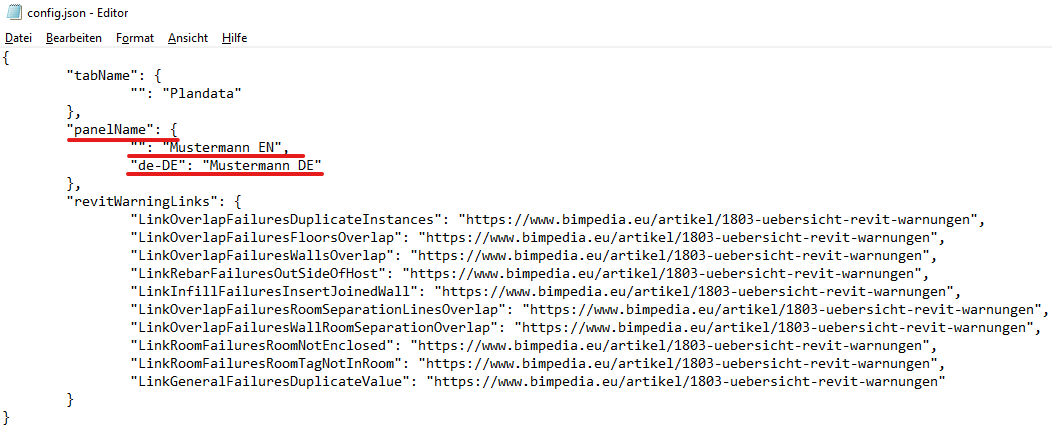
In this example, the value "Mustermann EN" is set as the default, and "Mustermann DE" is set for the German language. It should look like this:
You can then save the file and launch Revit. The panel should now have been successfully renamed:
Revit in German:


Some configurations support multiple languages, such as the Revit tab and panel names.
For example, if someone is using Autodesk Revit in English, they would likely prefer to see the panel name as "General" rather than "Allgemein."
Example of multilingual support in the "config.json" file:
Note that all lines except the last one end with a comma. If a comma is missing within the parentheses in any line, the JSON format is invalid and can no longer be read.
If you take a closer look at the lines between the brackets, you'll see that they follow a specific pattern:
"LANGUAGE CODE": "CONFIGURATION VALUE"
If the LANGUAGE_CODE has no value, the CONFIGURATION_VALUE is used for all languages supported by Revit.
The CONFIGURATION VALUE must not be left blank and must be set.
Therefore, "Plandata" is always used as the Revit tab name for "tabName".
"General" is always used for "panelName," except for the German language (indicated by the language code "de-DE"), for which "Allgemein" would be used.
The following examples can be used for both tab and panel names, even though only the panel name is used as an example here.
How do you add a language to a configuration?
(Note: A list of available language codes can be found in the "Language Codes" tab)
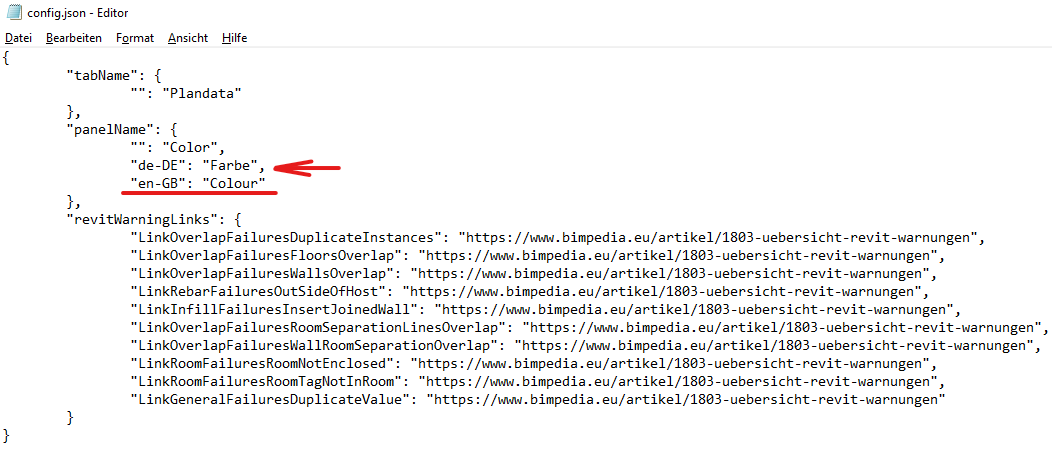
For example, if you want to access the following panel names:
| Language | Displayed panel name |
|---|---|
| All / Default | Color |
| German | Color |
| British English | Colour |
Currently, the "config.json" file is missing a line for British English.
To add these, simply copy one of the lines and paste it.
Next, set the correct LANGUAGE CODE and CONFIGURATION VALUE.
IMPORTANT: As mentioned earlier, every line except the last one must end with a comma. Otherwise, the JSON format is invalid and cannot be read by the add-in.
Example:
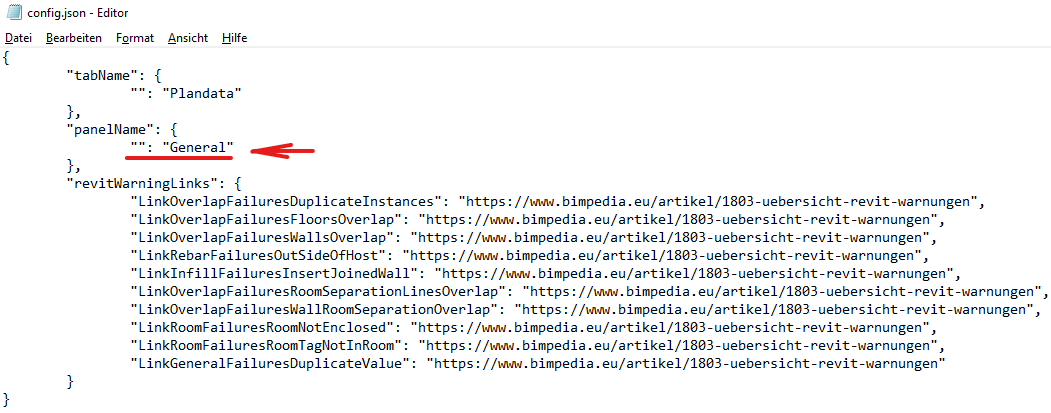
How do you remove a language?
If you want to remove a specific language because a translation isn't needed, you can simply delete the line containing the corresponding LANGUAGE CODE.
IMPORTANT: As mentioned earlier, every line except the last one must end with a comma. Otherwise, the JSON format is invalid and cannot be read by the add-in.
In the following example, the line containing the LANGUAGE CODE "de-DE" has been removed, so that the panel name is now "General" for every language.
AVAILABLE LANGUAGE CODES:
Available Revit languages: Use Revit in your preferred language (as of Revit 2024)
| Revit Language | LANGUAGE CODE |
|---|---|
| Brazilian Portuguese - PTB | pt-BR |
| Chinese (Traditional) - CHT | zh-TW |
| Chinese (Simplified) - CHS | zh-CN |
| German - DEU | de-DE |
| English (UK) - ENG | en-GB |
| English (US) - ENU | en-US |
| French - FRA | fr-FR |
| Italian - ITA | it-IT |
| Japanese - JPN | ja-JP |
| Korean - KOR | ko-KR |
| Polish - PLK | pl-PL |
| Russian - RUS | ru-RU |
| Spanish - ESP | es-ES |
| Czech - CSY | cs-CZ |
To uninstall Plandata add-ins, simply delete the files that you copied from the ZIP file during installation.
To do this, open the following path (replace "YEAR" with the year of the Autodesk Revit version; for example, "2023" for "Autodesk Revit 2023.1"):
%appdata%/Autodesk/Revit/Addins/YEAR
All open Revit windows must now be closed to prevent any issues from occurring during uninstallation.
For example, if you want to uninstall the "QS-Live" add-in—perhaps to install a new version—first locate the corresponding ".addin" file for the add-in and delete it.
The file name always ends with the add-in name, and the file extension is always ".addin".
If file extensions are not displayed, open the "View" tab in File Explorer and check the box next to "File name extensions."
Once you have deleted the file, you must also delete the corresponding add-in folder itself. This folder is located in the "Plandata" folder. Within this folder, there are additional folders, each of which corresponds to an add-in. Here, too, the folder names end with the name of the add-in.
In the case of QS-Live, the folder is named "EU.Plandata.AddIn.Revit.QSLive".
You can now delete this folder, which means the "QS-Live" add-in has been successfully uninstalled.
If you want to uninstall all Plandata add-ins—for example, because you’ve installed a Revit update and want to install the correct add-in versions for that update—all you need to do is delete the Plandata ".addin" files and the "Plandata" folder.
Any files that begin with "EU.Plandata.AddIn.Revit." can be deleted.
Once you've deleted the files, you still need to delete the "Plandata" folder itself.
If the folder and the ".addin" files have been deleted, then the Plandata add-ins have been successfully uninstalled.