The tool supports the generation of floor plans, structural plans, ceiling plans, and area plans from the layers available in the project.
Multiple views can be created simultaneously, view templates can be applied to them, and view crops can be selected for them. Additional, dependent views can also be created from the views that have been created.
To load this content, you need to allow the YouTube service.
Creating views manually based on layers can be quite time-consuming in Revit. Especially in large projects, where floor plans, for example, must be divided across multiple sheets, creating views with the appropriate presets for structural, mechanical, and electrical engineering can become a never-ending task.
- Batch processing - generate multiple views at once
- Use predefined view templates
- View names are generated automatically
With this add-in, you can:
- Generate views of different view types
- Create dependent views of the views just generated
- Create dependent views from views already present in the model
There are six different generation modes available. Use the tabs to navigate through the modes and learn more about each one.
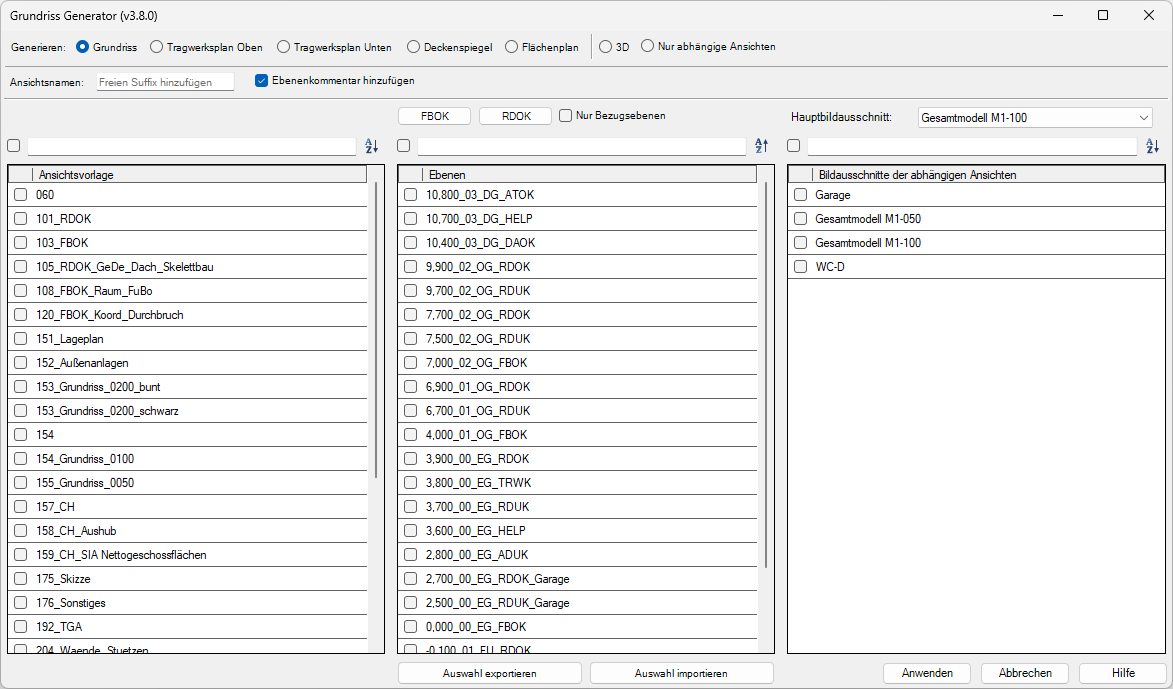
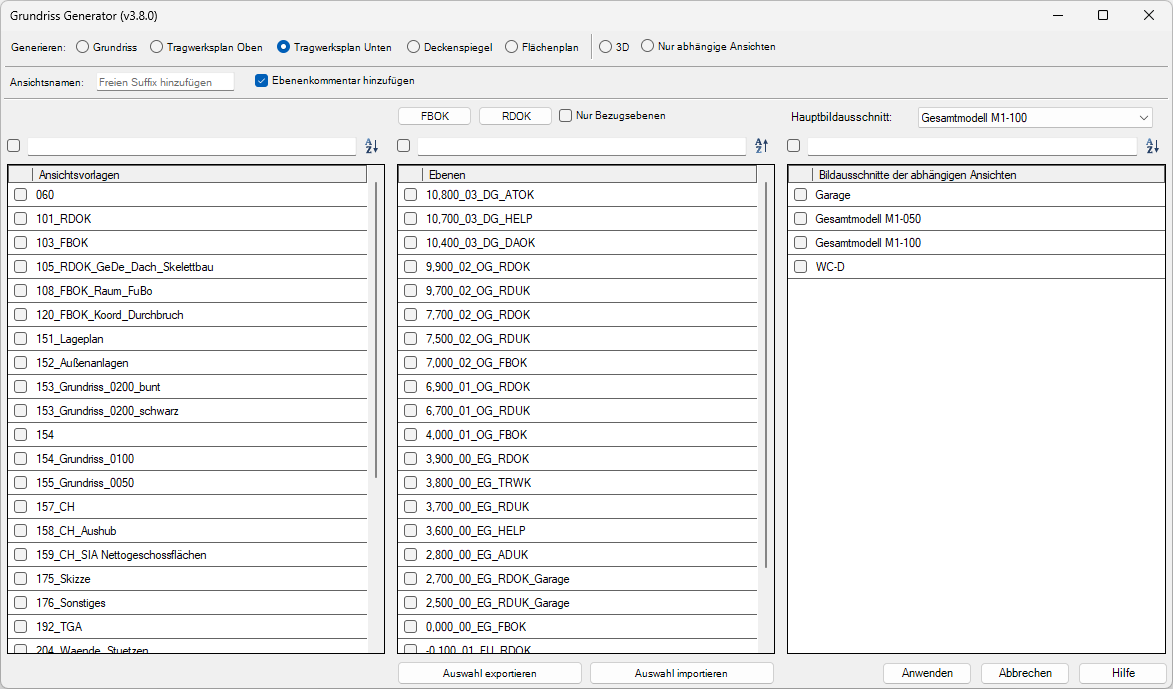
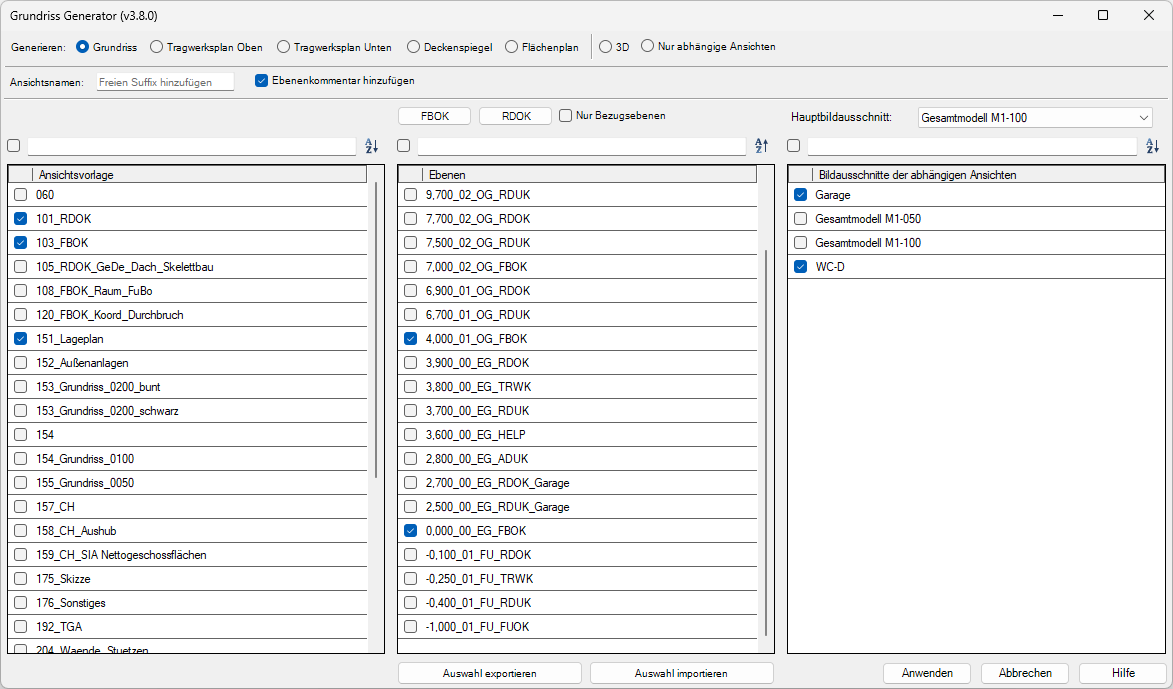
In Floor Plan mode, you can generate new floor plan views in the model.
The following settings are applied to the generated views:
- View template based on user selection
- Layer based on user selection
- Main image section based on user selection
- View names
The "Dependent Views" table provides the option to create additional dependent views for the generated views.
You can select any number of view templates, layers, and image sections.
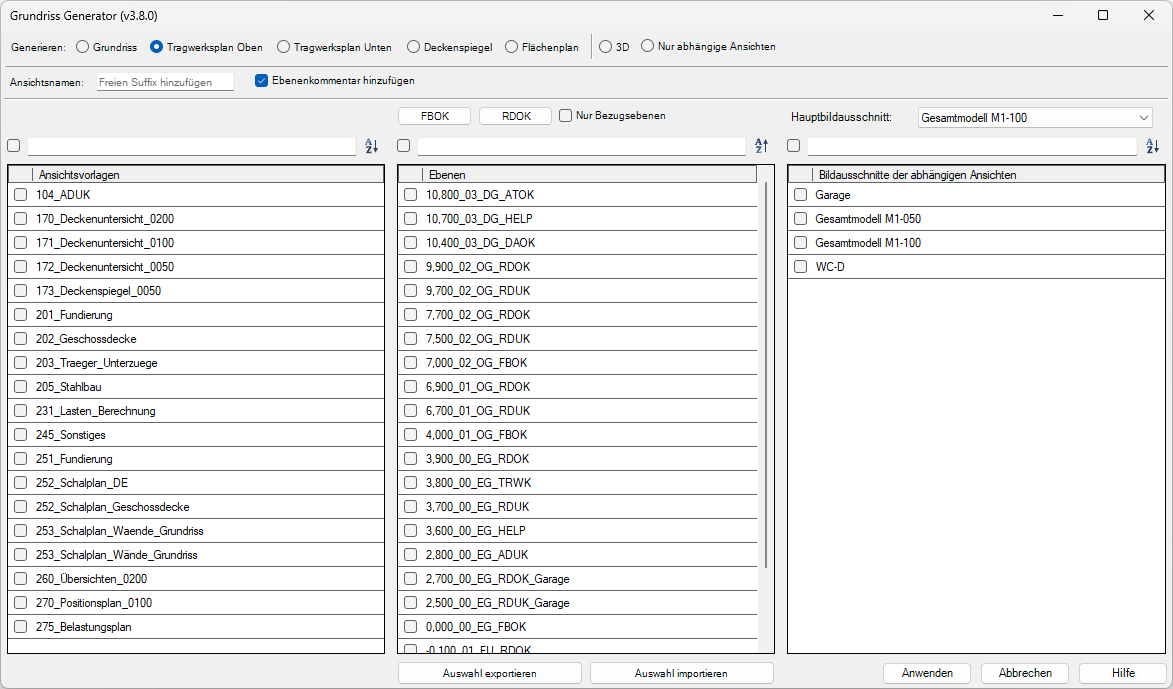
In Structural Design (Top) mode, you can generate new structural design views in the model. The following settings are applied to the generated views:
- Family type: View direction_top
- View template based on user selection
- Layer based on user selection
- Main view section based on user selection
- View names
The "Dependent Views" table provides the option to create additional dependent views for the generated views.
You can select any number of view templates, layers, and image sections.
In the Structural Design Bottom view mode, you can generate new structural design views in the model. The following settings are applied to the generated views:
- Family type: View direction_bottom
- View template based on user selection
- Layer based on user selection
- Main view section based on user selection
- View names
The "Dependent Views" table provides the option to create additional dependent views for the generated views.
You can select any number of view templates, layers, and image sections.
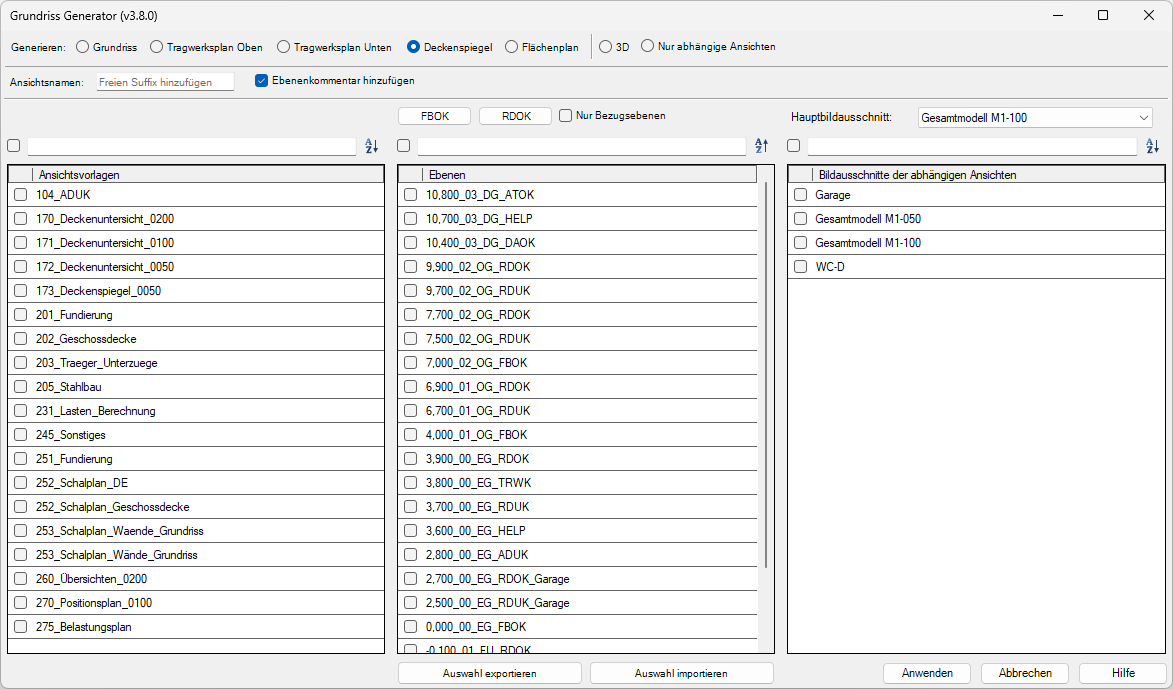
In the Ceiling Mirror mode, you can generate new ceiling mirrors in the model. The following settings are applied to the generated views:
- View template based on user selection
- Layer based on user selection
- Main image section based on user selection
- View names
The "Dependent Views" table provides the option to create additional dependent views for the generated views.
You can select any number of view templates, layers, and image sections.
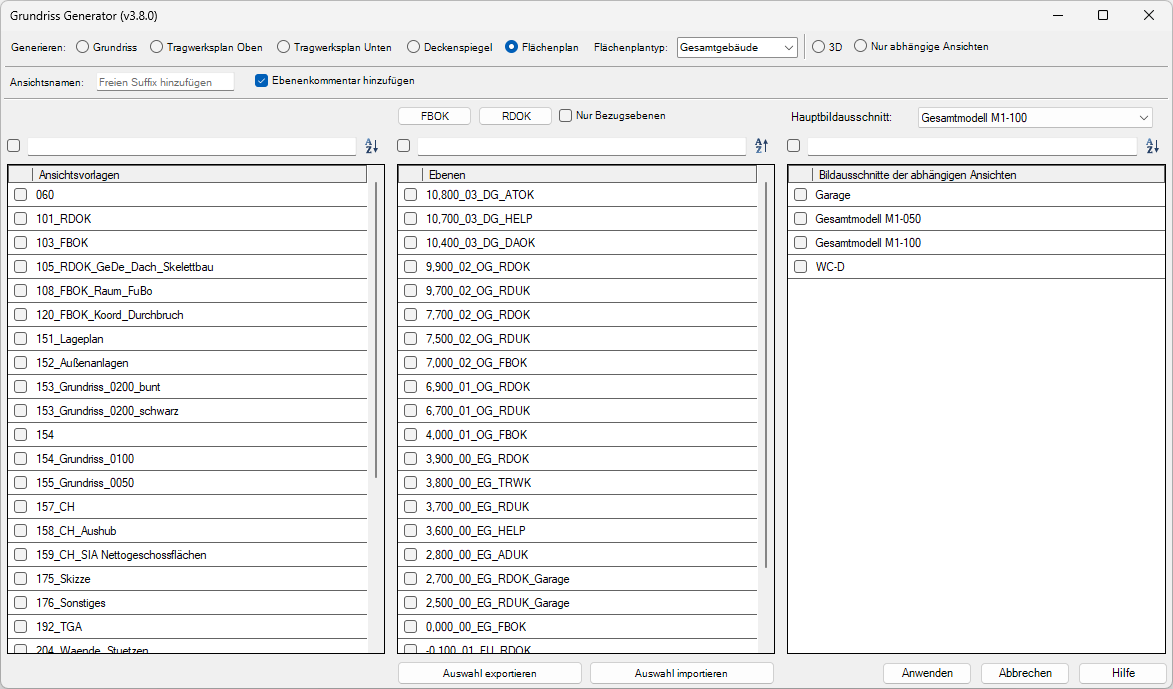
In Floor Plan mode, you can generate new floor plans in the model. The following settings are applied to the generated views:
- Layout type based on user selection
- View template based on user selection
- Layer based on user selection
- Main view section based on user selection
- View names
The "Table Image Slices for Additional Dependent Views" option allows you to create additional dependent views for the generated views.
You can select any number of view templates, layers, and image sections.
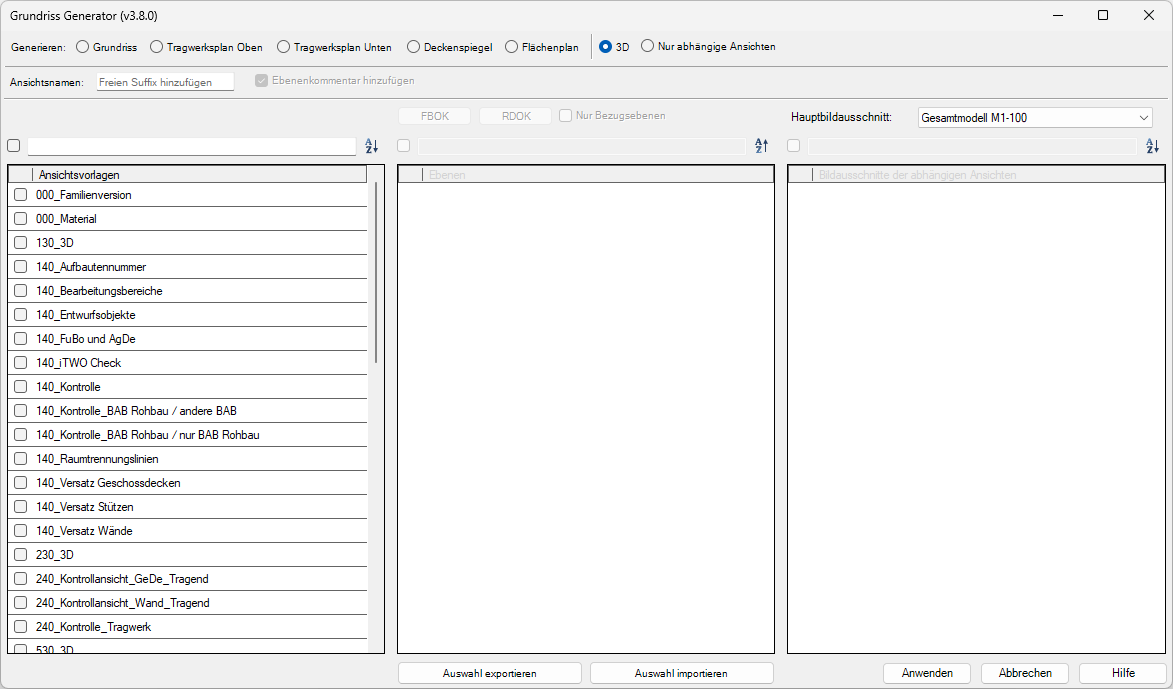
In 3D mode, you can generate 3D views. The following settings are applied to the generated views:
- Image crop based on user selection
- View name: Same as view template; an optional suffix can be added
You can select any number of view templates. All controls not needed in this mode are grayed out. Dependent views cannot be created in this mode.
In Dependent Views Only mode, you can generate dependent views from views that already exist in the model.
The following settings are applied to the generated views:
- Views based on user selection
- Image sections of the dependent views based on user selection
- View names
You can select as many views and image sections as you like.
One of the key benefits of this add-in is the automatic generation of view names; you can find the relevant nomenclature in the "Instructions – View Nomenclature" section. Optionally, you can add custom suffixes to the view names.
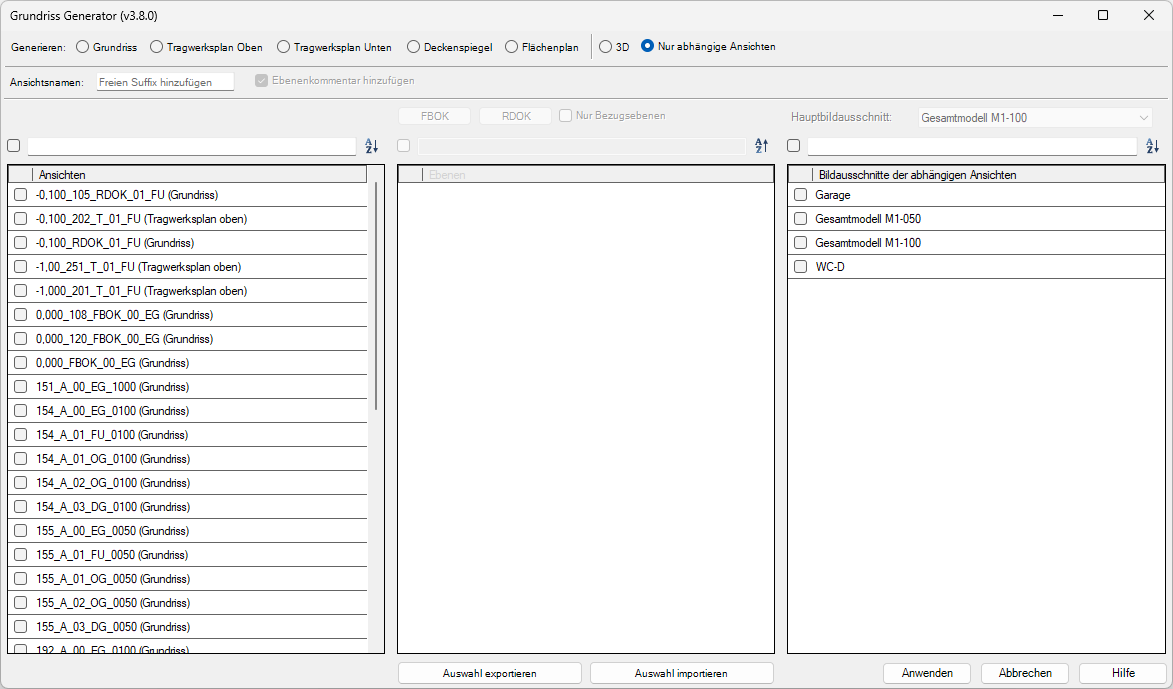
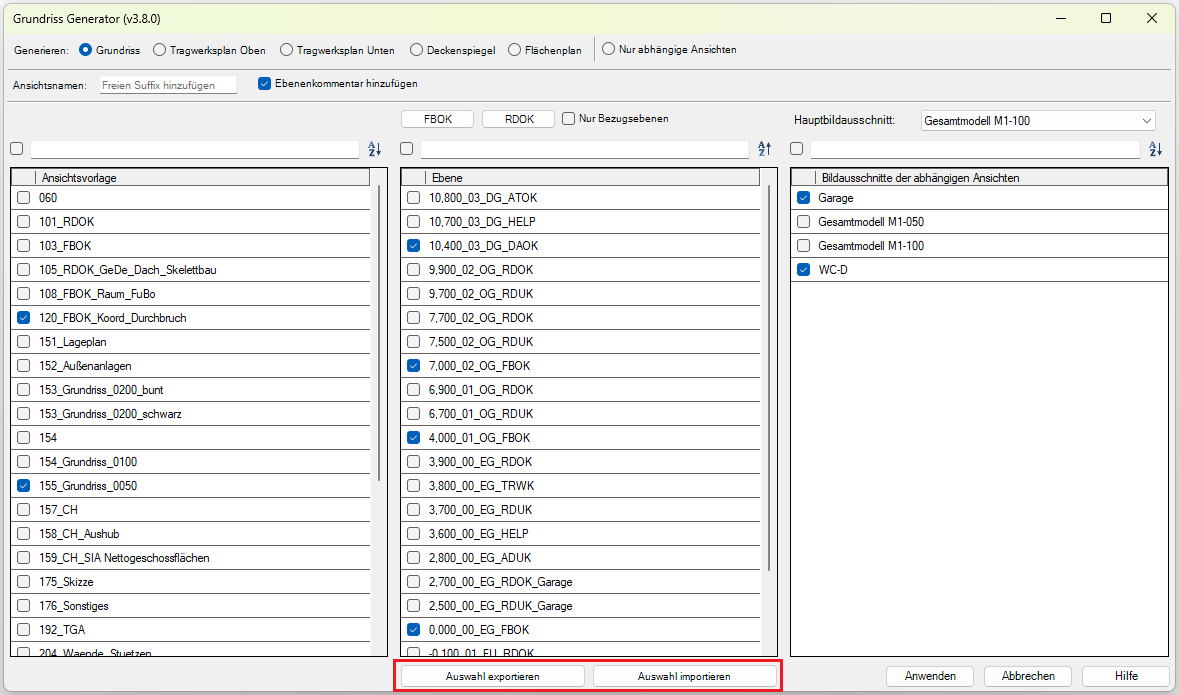
You can access the tool by clicking the button labeled "Floor Plan Generator."

Generate
After launching the program, a new window opens—the user interface. Image sections, view templates, and layers are loaded from the project and displayed in tables.
Sorting, Filtering, and Selecting Table Elements
The tables have three controls:
- a checkbox to select or deselect all visible items
- an input field for filtering the items
- a button to toggle the sort order
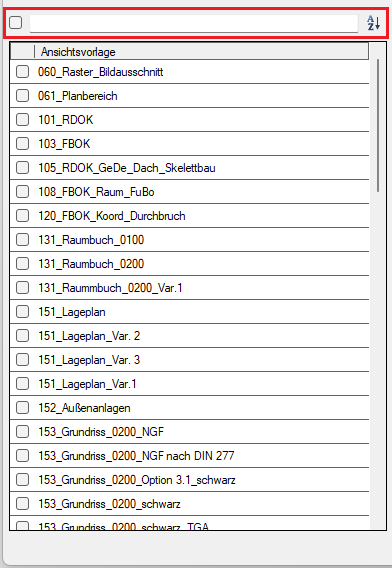
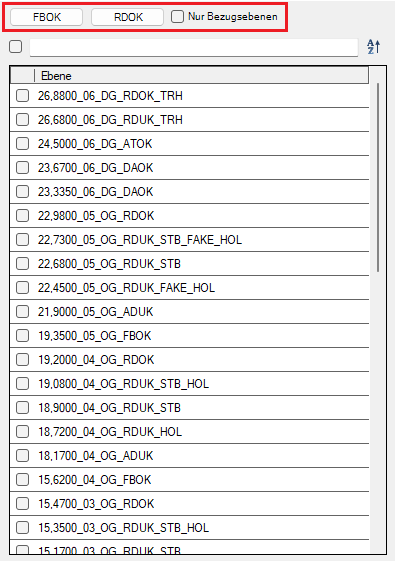
While the tables for view templates and image sections are sorted alphabetically, layers are sorted by their height. You can switch the sort order between ascending and descending using the corresponding button.
The tables can be filtered based on user input. Filtering is performed both by adding characters to the input field and by removing characters from the input field.
The checkbox for selecting or deselecting all elements always applies only to the elements that are currently visible. This allows you to enter a filter term in the input field and then select all filtered elements with a single click.
The layer table has three additional quick filter controls:
- FBOK
- RDOK
- Reference levels (floor levels) only
Selecting the Plant Type

The following plan types are available in the Generate row:
- Floor Plan
- Structural Plan (Top View) (Family Type: View Direction_Top)
- Structural plan, bottom view (Family type: View_direction_bottom)
- Ceiling plan
- Floor plan
Additional feature:
- Dependent Views
Only: No main view is generated here. This function allows you to create dependent views based on views that already exist in the model.
View names

In the "View Name" field, you can add a suffix to the view name. By default, the option to use the layer comment is enabled. The layer comment corresponds to the part of the layer name that follows the layer type (e.g., RDOK).
An additional, custom suffix can be added by entering it in the text field.
Example:
We are creating a view for layer 0.000_00_EG_FBOK_Main_Building.
We include the layer comment (= Main_Building) and add the custom suffix Overview.

The generated view is therefore named:
155_A_00_EG_0050_Main Building_Overview
If dependent views are also generated, they are given the name:
155_A_00_EG_0050_Main Building_Overview_Image Detail
The "View Nomenclature" section provides a detailed explanation of view names.
Generate floor plans
During generation,
1. Floor plans created based on the selected levels, and a selected main view (e.g., the entire building) defined
2. Created dependent floor plans and defined sub-view sections (e.g., construction phases)
3. Renamed the floor plans and applied the previously selected view templates to them
Example: Generating a floor plan based on the following user inputs.
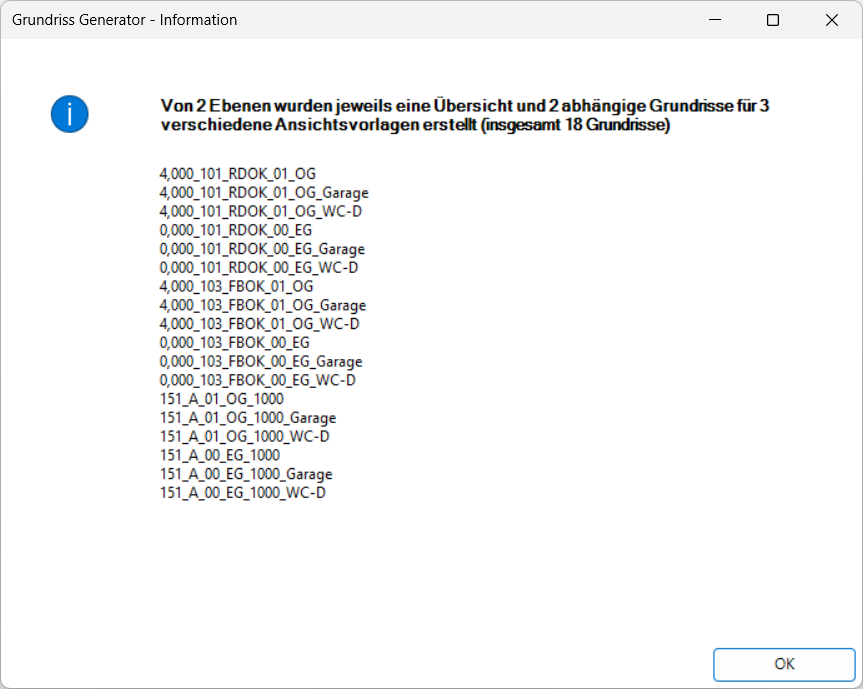
After clicking the "Apply" button, the corresponding views are generated. A report is then created in which the user can see the names of the newly created plans. In this window, plan names can be selected and copied.
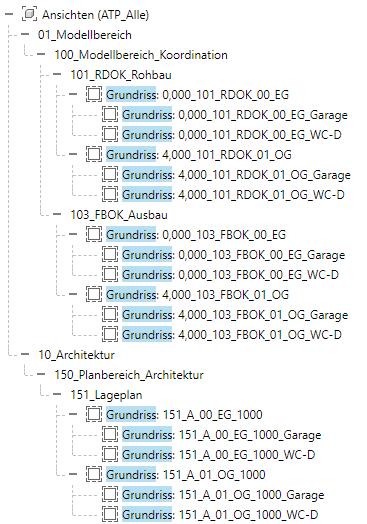
The result in Revit:
Import/Export Settings
User settings can now be saved in a JSON file. Load this file to speed up the process of generating the view.
The configuration file can be edited by the user.
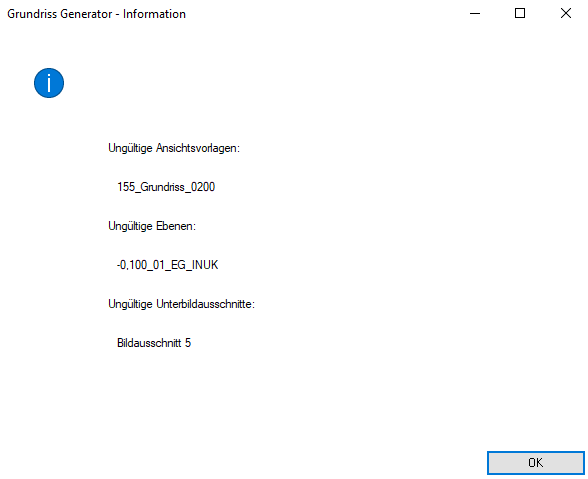
If the element that the user entered in the settings file does not exist in the current project, a dialog box will appear.
List of Views
Based on the value of parameter 000_150_Department, a distinction is made between the following two naming conventions:
1. If the value of parameter 000_150_Department is set to "01_Model Area," the view name is generated according to the following pattern:
View name = A_B_C
A: Part of the layer name (elevation reference): -1,000_01_FU_FUOK
B: Name section from applied view template: 120_FBOK_CoordBreakthrough
C: Part of the layer name: -1,000_01_FU_FUOK
Example of a view name composed according to the schema described above: -1,000_120_FBOK_01_FU
2. If the value of the parameter 000_150_Department is not "01_Model Area":
View Name = A_B_C_D
A: Part of parameter 000_000_150_ViewGroup: 155_floorplan_0050
B: Part of parameter 000_000_150_Department): 10_Architecture
C: Part of the layer name: -1,000_01_FU_FUOK
D: Part of the view scale: 1:50
View Name Example: 155_A_01_FU_0050
Dependent views are given the name of the image section as a suffix:
Example: 155_A_01_FU_0050_ImageSectionName
If the layer comment and a free suffix are to be added, the following naming convention applies:
Example: 155_A_01_FU_0050_Layer Comment_Free Suffix_Image Crop Name
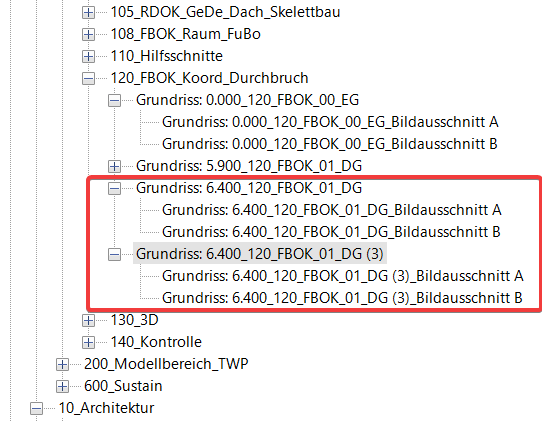
Name conflicts
The tool does not display an error message if a view with the same name already exists. Instead, a bracket with a number is appended to the view name to indicate that the newly created view is a duplicate of another view:
3.8.0.0
- New features:
- Create floor plans
- Create dependent views only
- Create 3D views
- Quick filters for planes: FBOK, RDOK, reference planes
- View names: add custom suffix, add layer comment
- General
- Welcome screen added—this also provides information about new versions.
- The "Help" button now links directly to the BIMpedia article.
- Bug fixed:
- View templates for structural drawings are now displayed correctly for top and bottom view directions.
3.10.0.0
- Revit versions 2026.0 through 2026.4 are now supported.
- Pressing the F1 key opens the BIMpedia article.
The tool is designed to work with Plandata's Revit Pro content: plan and elevation nomenclature in accordance with the Plandata BOA standard.
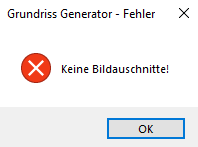
Missing image sections and/or view templates
The Revit document must contain at least one section view and one view template. Otherwise, an error message will appear when the tool is launched:
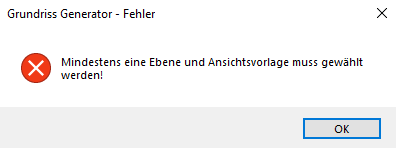
Not enough layers and/or view templates selected
Before clicking the OK button, you must select at least 1 layer and 1 view template. Otherwise, the following error message will appear: